Nowadays, it’s important to manage the information we and, especially, our children encounter online. It is very beneficial if you just want to have a quiet environment for work, if you want to shield your children from the bad content, or maybe just to avoid the distractions. This article will provide you with easy-to-follow instructions on how to block websites on iPhone along with some useful tips and tricks on the issue.
Understanding Screen Time and Content Restrictions
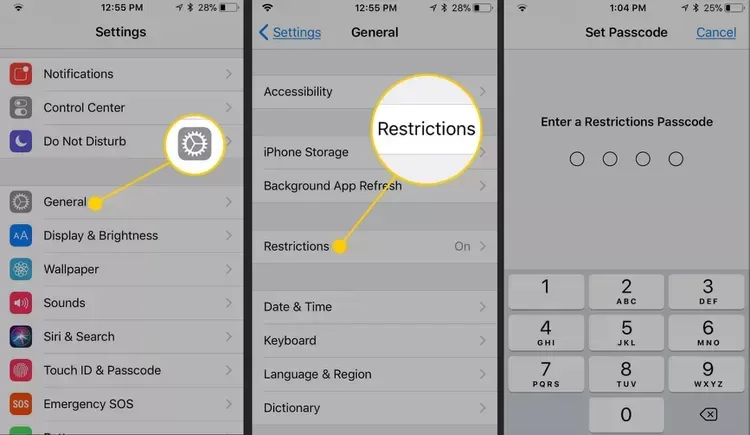
Screen Time in Apple devices has functions which enable you to set time to use the device and block certain websites. To access this feature, follow these steps:
1. Tap and open the Settings app icon on your iPhone.
2. Tap on Screen Time.
3. Tap Content & Privacy Restrictions in the list.
4. To do this, turn on the Content & Privacy Restrictions option.
5. Tap on Content Restrictions.

6. Tap on Web Content.
At this point, you’ll have three options to choose from:
1. Unrestricted Access: This makes it possible for you to surf the internet in every which way you want to.
2. Limit Adult Websites: This option says that part of the list of banned sites are sites that contain adult material, for example, pornographic or gambling.
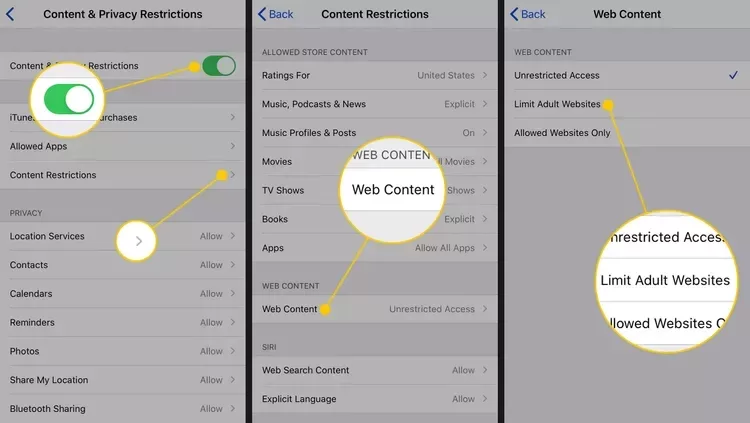
3. Allowed Websites Only: This setting enables u to develop a list of the only websites that should be gained access while all other sites are forbidden.
If you’re setting up parental controls on a new device, our guide on how to transfer data to a new iPhone can help ensure all your data is transferred smoothly.
Blocking Specific Websites
If you want to block specific websites, regardless of the content, you can do so by following these steps:
1. Then you choose settings; then the Screen Time option; and finally, the Content & Privacy Restrictions option.
2. Slide down, then click on Content Restrictions and tap on Web Content.
3. Select “Limit Adult Websites”.
4. Under the Never Allow section click on the add website option.
5. Type in the Web Address of the website that you wish to be blocked.
6. Press on “Add” button to store the website to the blocked list.
Step 4-6, repeat the steps with every website you wish to block. Remember that there can always be a mobile version of site which has a different URL and as such it will have to be blocked as well.
For those interested in managing their documents digitally, our article on how to scan a document on iPhone: a step-by-step guide provides excellent tips. Read Now!
Allowing Only Specific Websites
If you want to create a whitelist of approved websites and block access to everything else, follow these steps:
- Go to Settings > Screen Time > Content & Privacy Restrictions.
- Tap on Web Content under Content Restrictions.
- Select “Allowed Websites Only”.
- Tap on “Add Website” under “Always Allow” section.
- Enter the URL of the website you want to allow.
- Tap on “Add” to save the website to the allowed list.
Repeat steps 4-6 for each website you want to allow. This setting will block access to all websites except those you have explicitly added to the allowed list.
Having trouble connecting your AirPods? Don’t miss our step-by-step guide on Airpods not connecting to iPhone: a complete guide to fix it quickly!
Additional Tips and Tricks
- Use Strong Passcodes: When setting up screen time restrictions, make sure to use a strong passcode that is difficult for others to guess. This will prevent unauthorized changes to your settings.
- Review and Update Regularly: Periodically review the websites you have blocked or allowed, and make adjustments as needed. As new websites emerge, you may want to add them to your blocked or allowed list.
- Consider Third-Party Apps: While Apple’s built-in screen time feature is a powerful tool, there are also third-party apps available that offer additional website blocking and parental control features.
- Educate and Communicate: If you are blocking websites for your children, make sure to have open conversations about online safety and the reasons behind the restrictions. This will help them understand the importance of responsible internet usage.
- Be Aware of Workarounds: Keep in mind that determined users may find ways to bypass website restrictions, such as using a different web browser or accessing the website through a proxy server. Stay vigilant and keep your restrictions up-to-date.
For more troubleshooting tips on Apple products, check out our detailed guide on fixing issues with your Apple Remote and soundbar!
Final Words
Blocking websites on your iPhone is a simple yet effective way to manage your online experience and protect your family from harmful or distracting content. By utilizing Apple’s Screen Time feature and following the steps outlined in this guide, you can take control of your device usage and create a safer, more focused digital environment. Regular review and communication are key to maintaining effective website restrictions over time.

")


