One of the things you come across when you lose your old iPhone, or purchase a new one, data migration or switch can be quite a challenge. Still, Apple has made this very easy through the following methods. In this article, we’ll discuss the most efficient techniques on how to transfer data to a new iPhone to help you accomplish a seamless migration to the new iPhone safely.
Quick Start Method
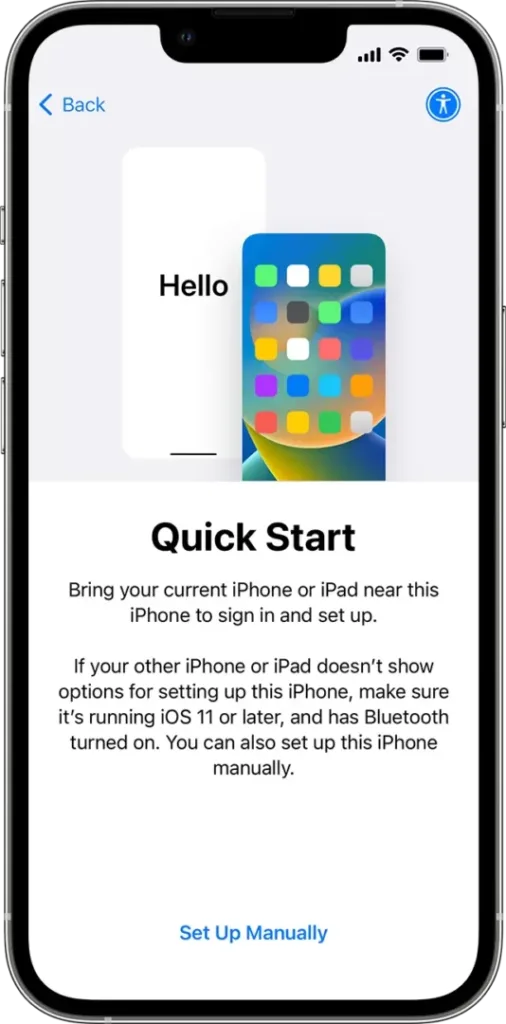
The Quick Start can be the simplest method of transferring data from your old iPhone to a new one. Here’s how to do it:
1. Prepare Both Devices: Make sure the old phone you are using is charged and place near the new phone. Your old device: Should have iOS 11 or any later version on it.
2. Turn on Bluetooth: Ensure that Bluetooth is on in your earlier model iPhone.
3. Start the Setup: Switch on the new iPhone that you have and ensure that it is close to the previous device that you were using. A pop up message should appear the moment you connect your old iPhone to the new iPad stating that a new device has been connected and if you want to set it up.
4. Follow the On-Screen Instructions: Thus, the following steps should be followed to set up the device: You may have to sign in with your Apple ID and, if you’re using an iPhone X or later, you might need to configure Face ID. If using an earlier model iPhone, you might need to configure Touch ID.
5. Choose Data Transfer Method: Data can be migrated from the previous iPhone itself or user can restore data from iCloud. Selecting a direct transfer, ensure that both the devices are connected to power source until the transfer is complete.
6. Complete the Setup: After the transfer, your new iPhone will have all your apps along with the specific settings you used in the previous iPhone.
Want to learn more cool tricks? Check out our guide on scanning documents directly from your iPhone!
iCloud Backup Method
If you wish not to go for Quick Start, you can sync your data through iCloud. Here’s how:
1. Backup Your Old iPhone: Ensure that the old iPhone is connected to Wi-Fi, go to Settings, tap on the user ID then iCloud, and tap on iCloud Backup then hit on Back Up Now.
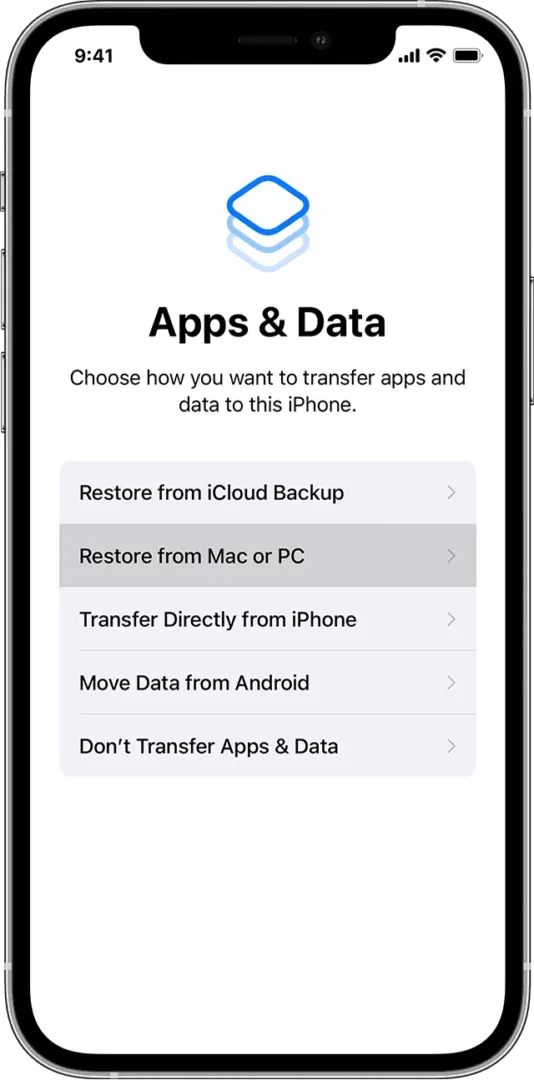
2. Set Up Your New iPhone: Switch on your new iPhone, then set it up and get right up to the point where the Apps & Data screen pops up.
Restore from iCloud Backup: Select Restore from iCloud Backup and sign in with your Apple ID. Choose the most recent backup to restore your data.
Wait for the Restore: Keep your device connected to Wi-Fi and plugged in until the restore process is complete.
Protect your browsing experience! Learn how to block distracting or harmful websites on your iPhone with our simple guide.
iTunes/Finder Method
For those who prefer using a computer, the iTunes or Finder method is a great alternative:
- Connect Your Old iPhone: Use a USB cable to connect your old iPhone to your computer. Open iTunes (or Finder on macOS Catalina and later).
- Backup Your Old iPhone: Click on your device icon in iTunes/Finder, then select Back Up Now. Ensure you choose to back up your data to your computer.
- Set Up Your New iPhone: Disconnect your old iPhone and connect your new iPhone to the computer.
- Restore from Backup: In iTunes/Finder, select your new iPhone and choose Restore Backup. Select the most recent backup to transfer your data.
- Complete the Setup: Follow the on-screen instructions to finish setting up your new iPhone.
Struggling to connect your AirPods? Discover quick and easy solutions in our simple guide ”AirPods Not Connecting to iPhone: A Complete Guide” to get them working seamlessly again.
Additional Transfer Methods
While the three methods above are the most common, there are other ways to transfer data to your new iPhone:
- Using Third-Party Apps: Some apps like AnyTrans or Dr.Fone can facilitate data transfer between devices. These apps often provide additional features, such as selective data transfer, which can be useful if you do not want to move everything.
- Transfer SIM Card: If your new iPhone uses the same size SIM card as your old one, you can simply transfer the SIM card. This will help you keep your phone number and mobile data settings intact.
- Manual Transfer: For certain types of data, like photos or music, you can manually transfer them by using cloud services like Google Drive, Dropbox, or even email. This method is useful if you want to selectively choose what to transfer.
Troubleshooting Common Issues
Sometimes, issues may arise during the data transfer process. Here are some common problems and their solutions:
- Devices Not Recognizing Each Other: Ensure both devices are updated to the latest iOS version. Restart both devices and try again.
- Slow Transfer Speeds: If the transfer is taking too long, check your Wi-Fi connection. A weak signal can slow down the process. If using Quick Start, ensure both devices are close together.
- Insufficient Storage: If your new iPhone doesn’t have enough storage to accommodate the data, consider deleting some unnecessary apps or files before starting the transfer.
Is your Apple Remote not pairing with your soundbar? Find out our guide ”Why Won’t My Apple Remote Work with My Soundbar?” and learn how to fix the issue and enjoy uninterrupted sound.
Tips for a Smooth Transfer
To ensure a hassle-free experience while transferring data to your new iPhone, consider the following tips:
- Backup Regularly: Make it a habit to back up your old iPhone regularly. This way, you will always have the latest data available for transfer.
- Check Compatibility: Ensure that your old iPhone is compatible with the transfer method you choose. For example, Quick Start requires both devices to be running iOS 11 or later.
- Use a Stable Wi-Fi Connection: A stable and fast Wi-Fi connection is crucial for a smooth transfer, especially when using iCloud.
- Keep Devices Charged: Make sure both devices are charged or plugged in during the transfer to avoid interruptions.
Final Words
Transferring data to a new iPhone can be done easily with the right method. Whether you choose Quick Start, iCloud, or iTunes/Finder, you’ll have your new device ready in no time. By following the steps outlined above, along with the tips for a smooth transfer, you can ensure that all your important data is safely moved to your new iPhone. Enjoy your new device and all the features it has to offer!

