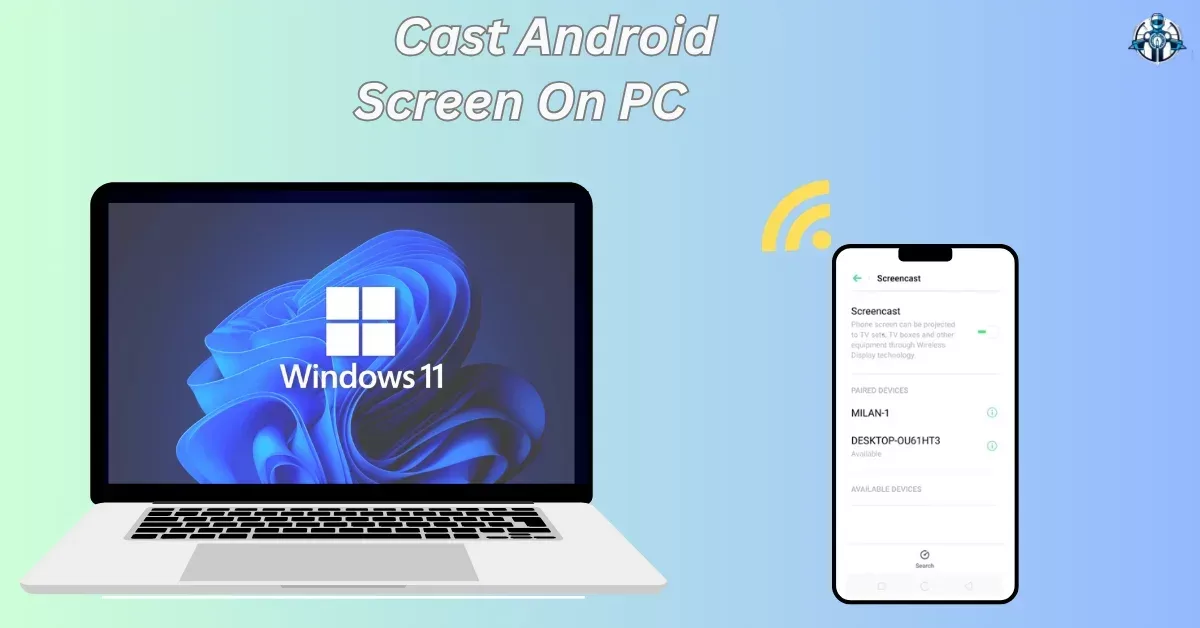
Are you looking for a way to transfer the display of your Android smartphone to Windows PC then this is perfect for you, without the need of any cable or an application? Whether you want to watch your images and movies on the big screen, share a document on your smartphone with your PC, or play your favorite Android games with a longer keyboard and keyboard buttons, you can do this by using the smartphone screen broadcast or replicating Windows 11.
Here, we will briefly explain the easy steps of screen casting/mirroring Android phone to Windows 11 PC without the use of any third-party app. This method is easy to use, and it can be applied to most Android devices and Windows 11 laptops and desktops.
Requirements
To cast/mirror your Android phone screen to a Windows 11 PC wirelessly, you need the following:
- A Windows 11/10 PC with the Wireless Display optional feature installed and the Projecting to this PC feature enabled.
- An Android smartphone with the Screen cast feature enabled or the Quick Settings app installed.
- A stable Wi-Fi network that both devices are connected to.
Steps to Cast/Mirror Android Screen to Windows 11 PC Wirelessly
Here are the steps to cast/mirror your Android phone screen to Windows 11 PC wirelessly:
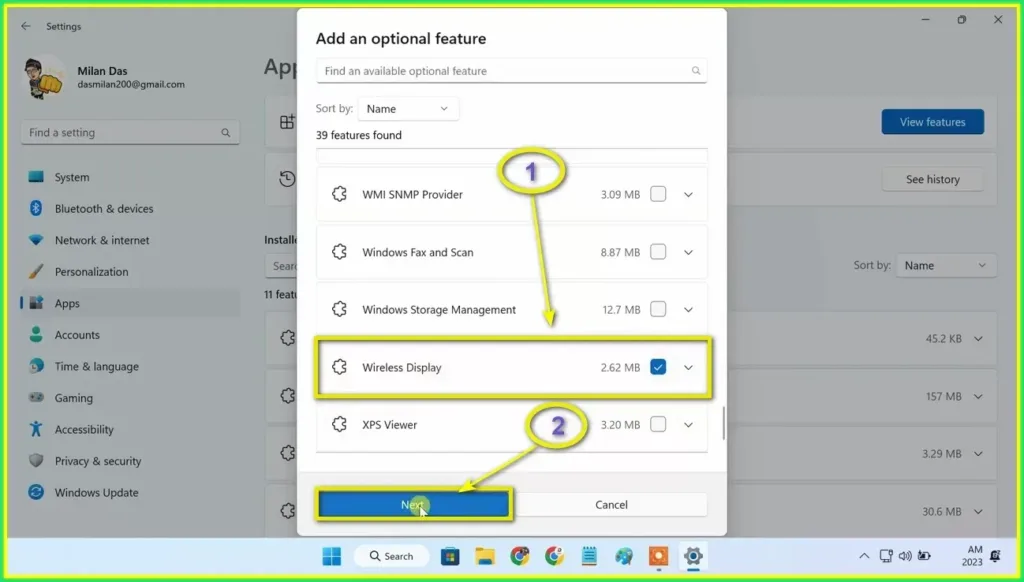
Step 1: Install the Wireless Display Optional Feature on Windows 11
Before you can cast/mirror your phone screen to your PC, you need to install the Wireless Display optional feature on your Windows 11 system. This feature enables your PC to receive wireless display signals from other devices. To install this feature, follow these steps:
1. Open Windows Settings using the Windows key + I keyboard shortcut.

2. Go to the Apps section using the sidebar menu.
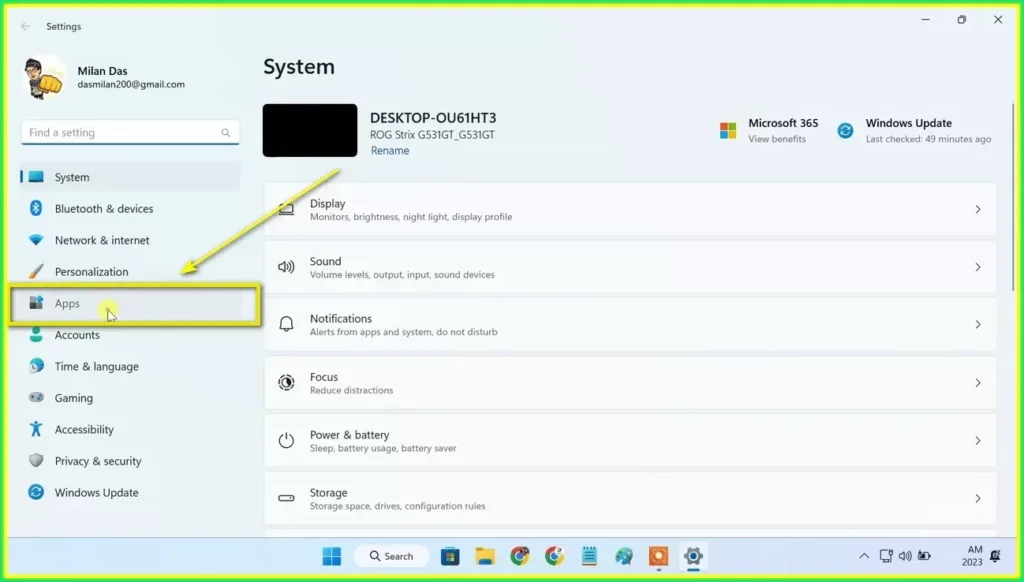
3. Click on the Optional Features.
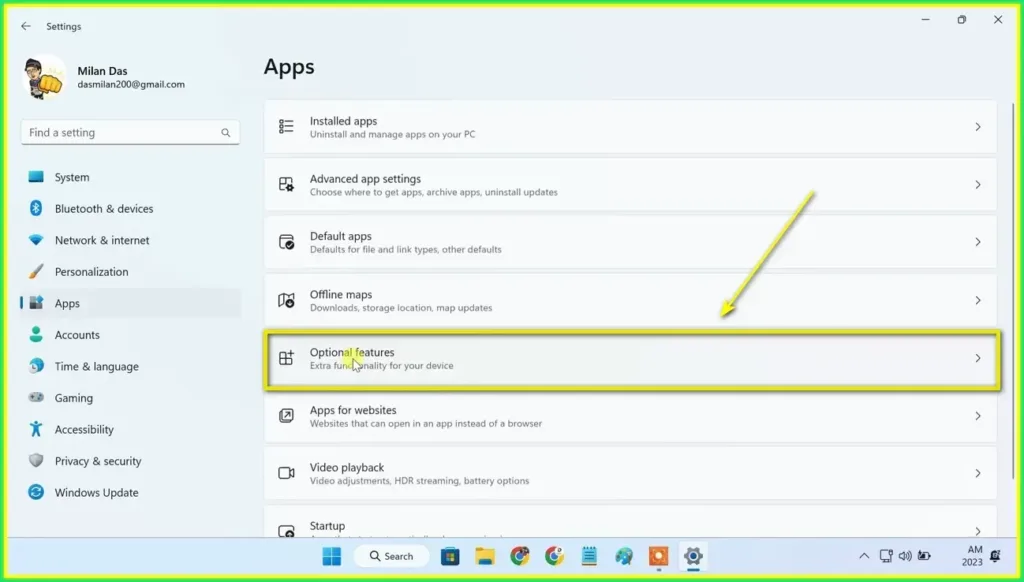
4. Here, click on View Features next to Add an optional feature.
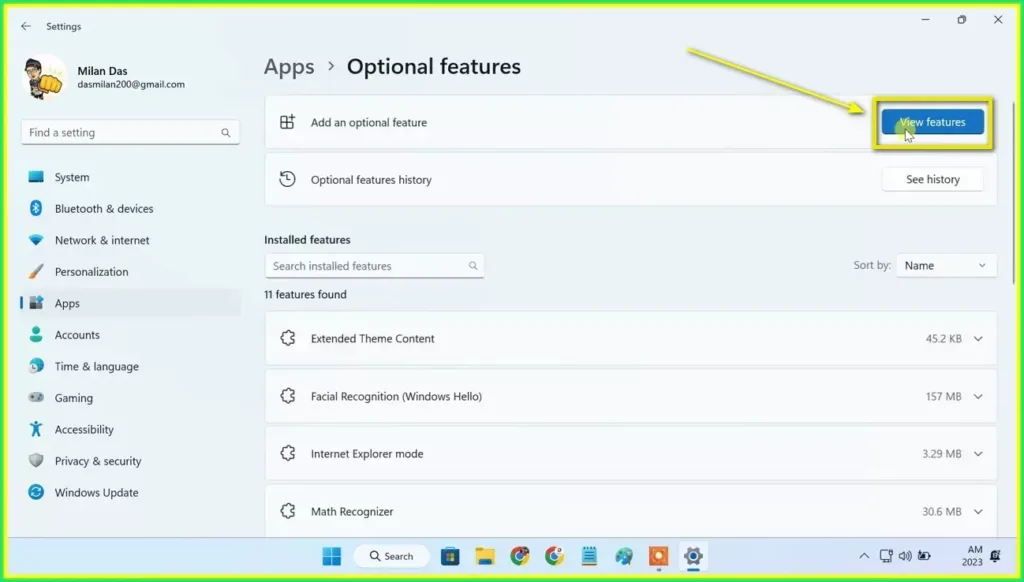
5. Using the search bar above, look for Wireless Display.
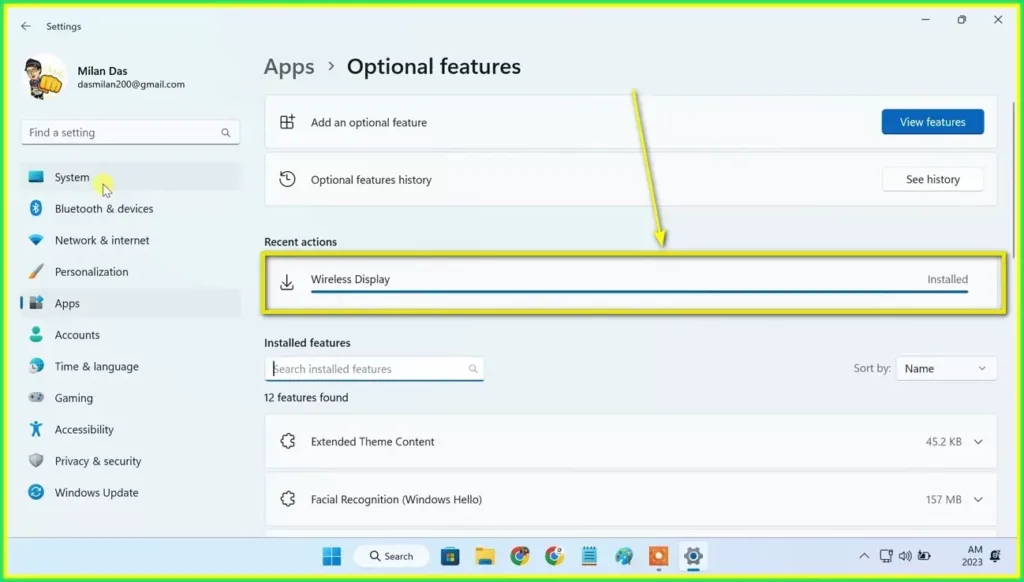
6. Tick the box next to Wireless Display from the list of results, select Next, then select Install.
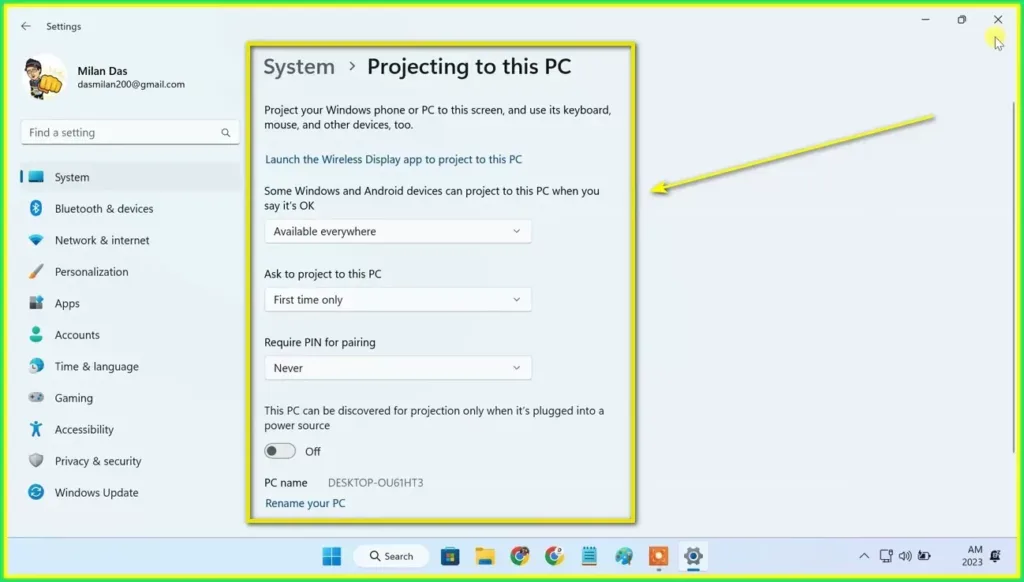
Step 2: Enable Projecting to this PC on Windows 11
After installing the Wireless Display feature, you need to enable the Projecting to this PC feature on your Windows 11 system. This feature allows you to adjust the settings for receiving wireless display signals from other devices. To enable this feature, follow these steps:
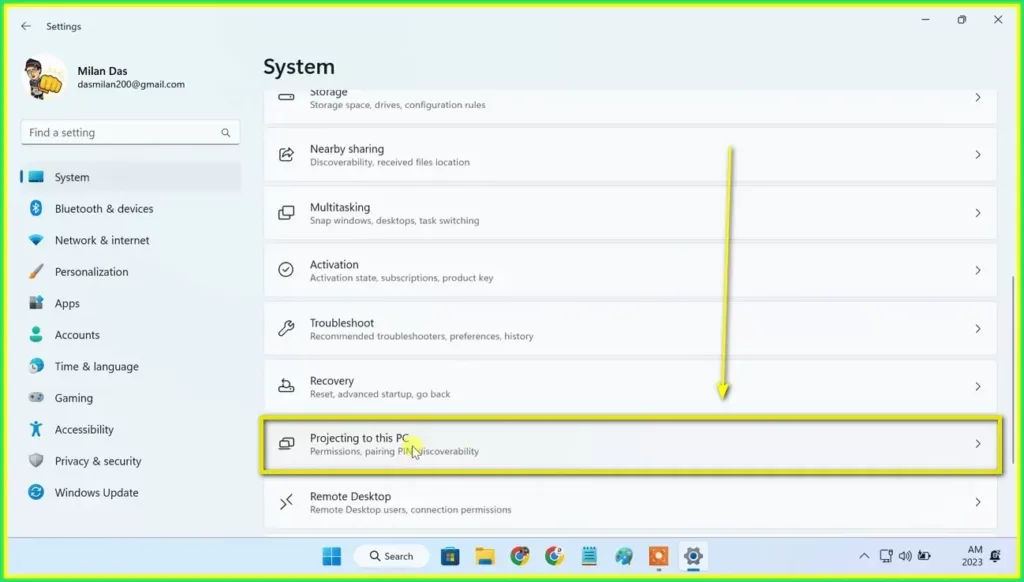
1. On Windows Settings, go to the System section.
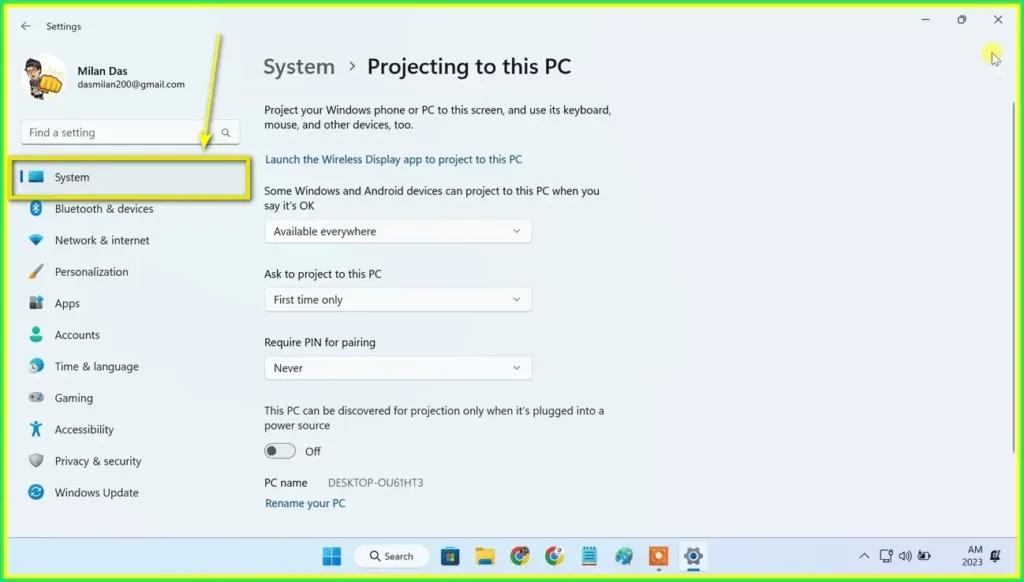
2. Scroll down and click on Projecting to this PC.
3. Here, change the following settings as shown below:
- Some Windows and Android devices can project to this PC when you say it’s OK: Select Available everywhere or Available everywhere on secure networks depending on your preference.
- Ask to project to this PC: Select First time only or Every time depending on your preference.
- Require PIN for pairing: Select Never or First time only depending on your preference.
- This PC can be discovered for projection only when it’s plugged in: Turn this Off or On depending on your preference.

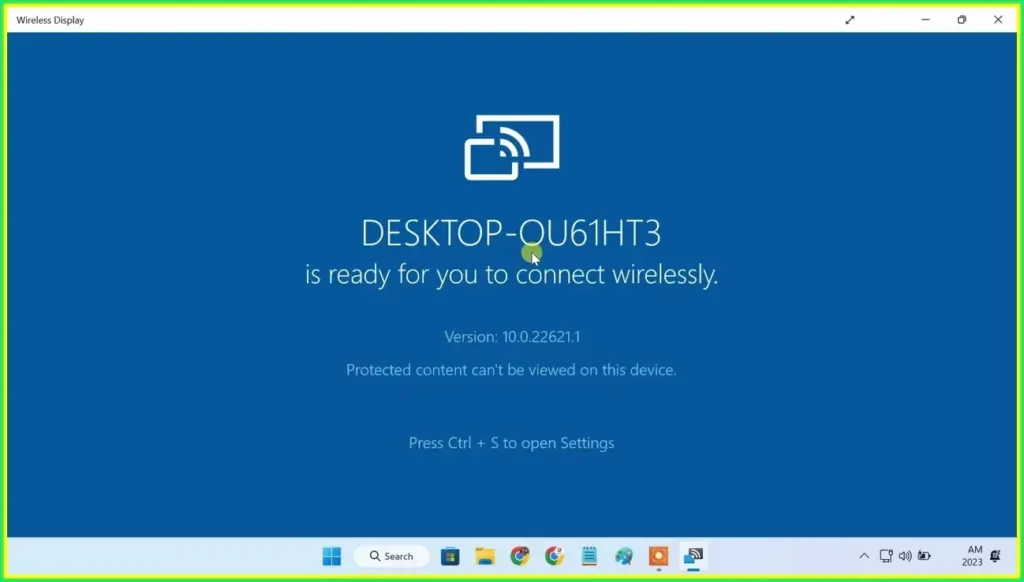
4. Next, click on Launch the Wireless Display app to project to this PC. You should now see a blue screen stating your device is ready for wireless connection.
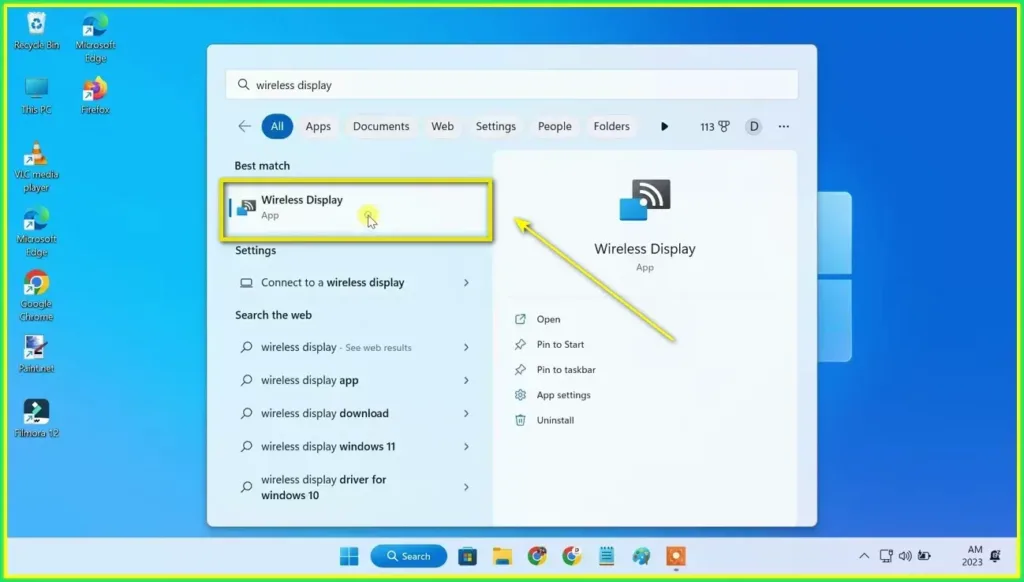
Step 3: Launch the Wireless Display App on Windows 11
Now that you have enabled the Projecting to this PC feature on your Windows 11 system, you need to launch the Wireless Display app on your PC. This app will show you the name of your PC and a QR code that you can scan with your phone to connect. To launch this app, follow these steps:
1. On your Windows 11 PC, go to the Start menu and type Wireless Display in the search box.
2. You should now see a blue screen with the name of your PC and a QR code. Keep this screen open and move on to the next step.
Step 4: Enable Screen Cast on Android
Now that you have launched the Wireless Display app on your Windows 11 PC, you need to enable the Screen Cast feature on your Android smartphone. This feature allows you to cast or mirror your phone screen to other devices wirelessly. To enable this feature, follow these steps:
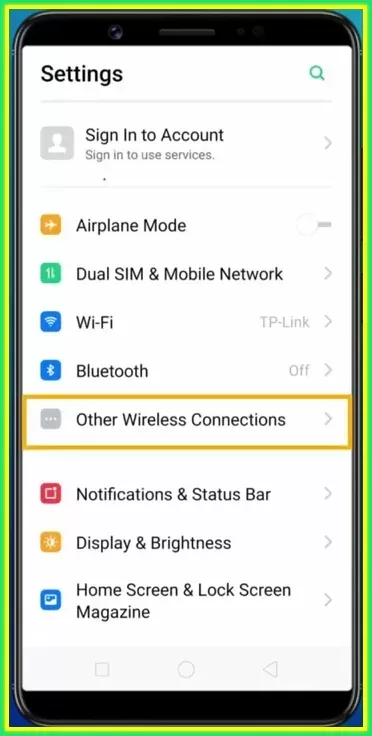
1. On your Android phone, go to the Settings app and look for the Screen cast or Cast option. This option may be located under different menus depending on your phone model and Android version. For example, on some Samsung phones, you can find it under Connections > More connection settings > Screen cast. On some Xiaomi phones, you can find it under Display > Cast. On some Google Pixel phones, you can find it under Connected devices > Connection preferences > Cast.
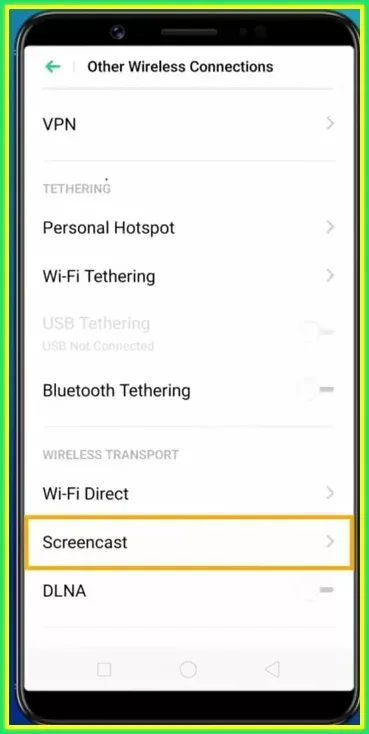
2. Tap on the Screen cast or Cast option and enable it if it is not already enabled.
3. You should see a list of available devices that you can cast or mirror your phone screen to. Select your Windows 11 PC from the list. You may need to scan the QR code on your PC screen with your phone camera or enter a PIN code or confirm the connection request on your PC or phone.
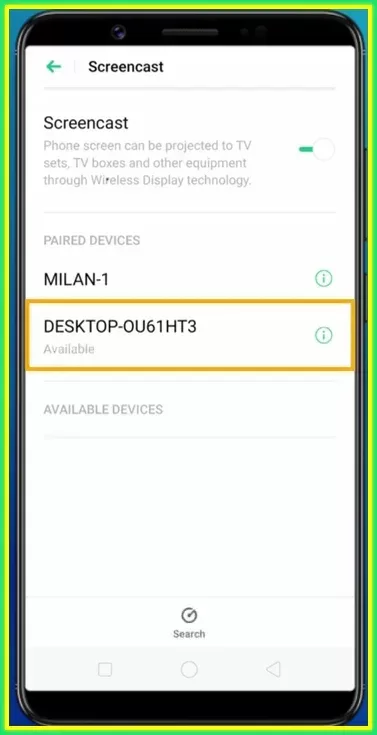
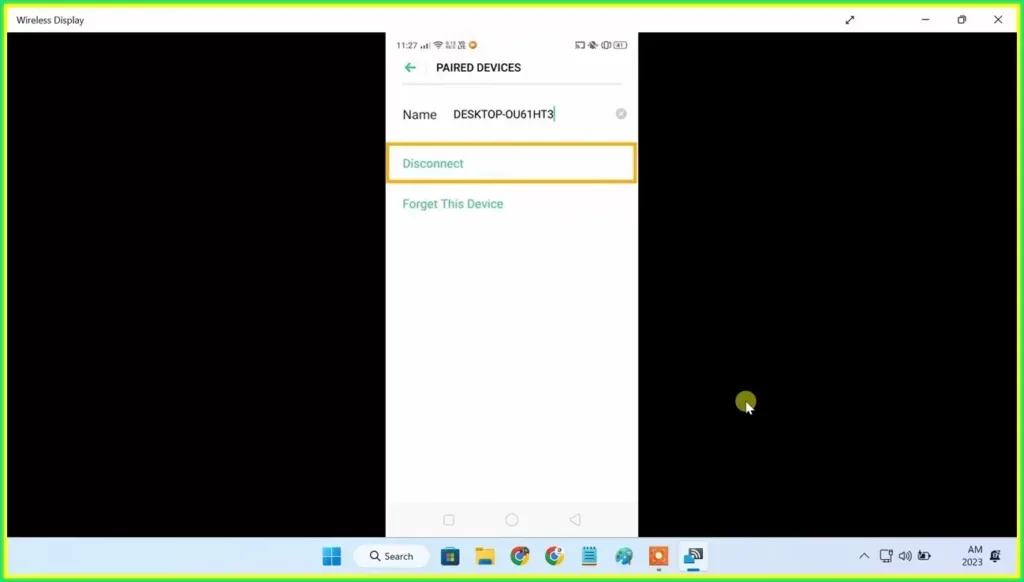
4. Once the connection is established, you should see your phone screen mirrored on your PC.
Step 5: Enjoy Your Mirrored Phone Screen on Windows 11
Now that you have connected your Android phone to your Windows 11 PC wirelessly, you can enjoy your mirrored phone screen on your PC. You can view your photos and videos, play your games, browse your apps, and do anything else that you can do on your phone. You can also control your phone from your PC using your mouse and keyboard.
To end the screen mirroring session, just disconnect from your phone or close the Wireless Display app on your PC.

What to Do If There Is No Screen Cast Option on Your Phone?
If your Android phone does not have the Screen Cast feature or you cannot find it in your settings, don’t worry. You can still cast/mirror your phone screen to Windows 11 PC wirelessly using a free app called Quick Settings. This app will enable the Screen Cast functionality on your phone and allow you to add the Cast icon to your quick settings panel. To use this app, follow these steps:
Step 1: Install Quick Settings App on Android
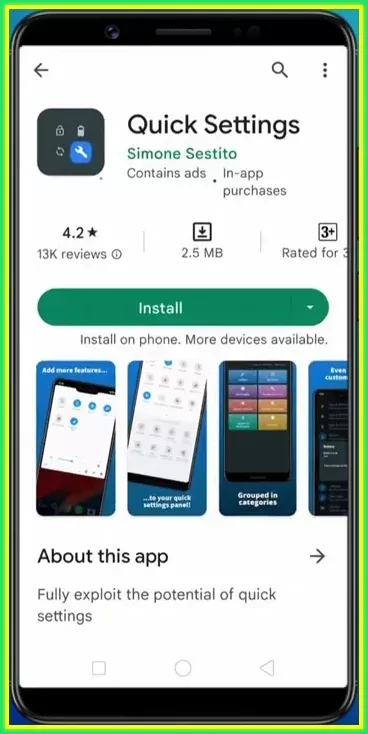
To use Quick Settings, you need to install it on your Android phone from the Google Play Store. To install this app, follow these steps:
- On your Android phone, go to the Google Play Store app and search for Quick Settings.
- Tap on the Quick Settings app from the list of results. Make sure you select the one developed by Simone Sestito.
- Tap on the Install button and wait for the app to download and install on your phone.
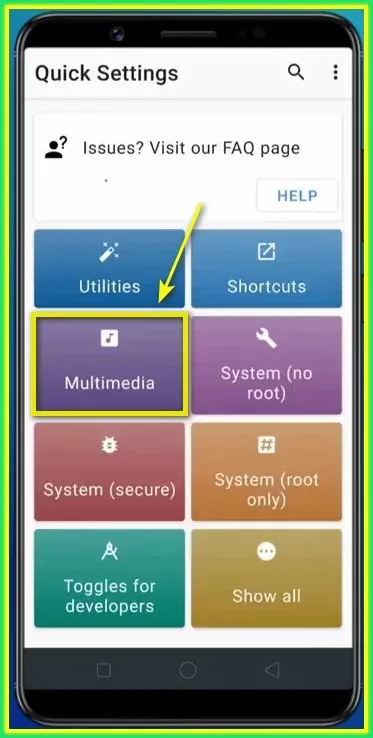
Step 2: Launch Quick Settings App and Select Multimedia Option
After installing Quick Settings, you need to launch it on your phone and select the Multimedia option. This option will allow you to enable the Cast feature on your phone. To do this, follow these steps:
- On your Android phone, go to the Quick Settings app and tap on it to open it.
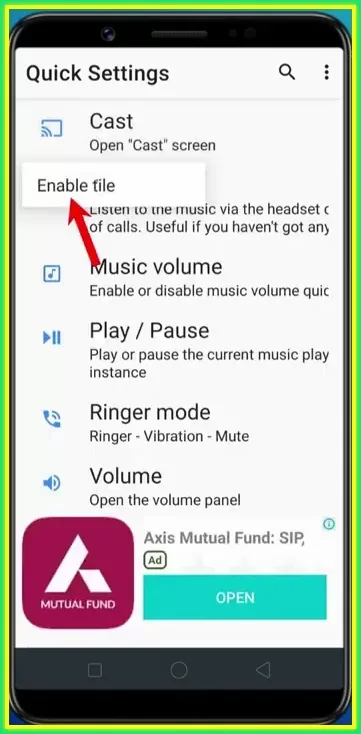
- On the app’s main screen, tap on the Multimedia option. You should see a list of multimedia features that you can enable or disable on your phone.
- Tap on the Cast option and select Enable File. This will enable the Cast feature on your phone and add the Cast icon to your quick settings panel.
Step 3: Pull Down Quick Settings Panel and Add Cast Icon
Now that you have enabled the Cast feature on your phone using Quick Settings, you need to add the Cast icon to your quick settings panel. This will allow you to access the Cast feature easily and quickly. To do this, follow these steps:
- On your Android phone, pull down the quick settings panel from the top of your screen. You should see a list of icons that represent various settings and features on your phone.
- Drag the Cast icon from the bottom list to the top list and place it where you want it to appear on your quick settings panel. You can also rearrange the order of the icons by dragging them around.
Step 4: Tap on Cast Icon to Open Cast Screen
Now that you have added the Cast icon to your quick settings panel, you can use it to cast/mirror your phone screen to your Windows 11 PC wirelessly. To do this, follow these steps:
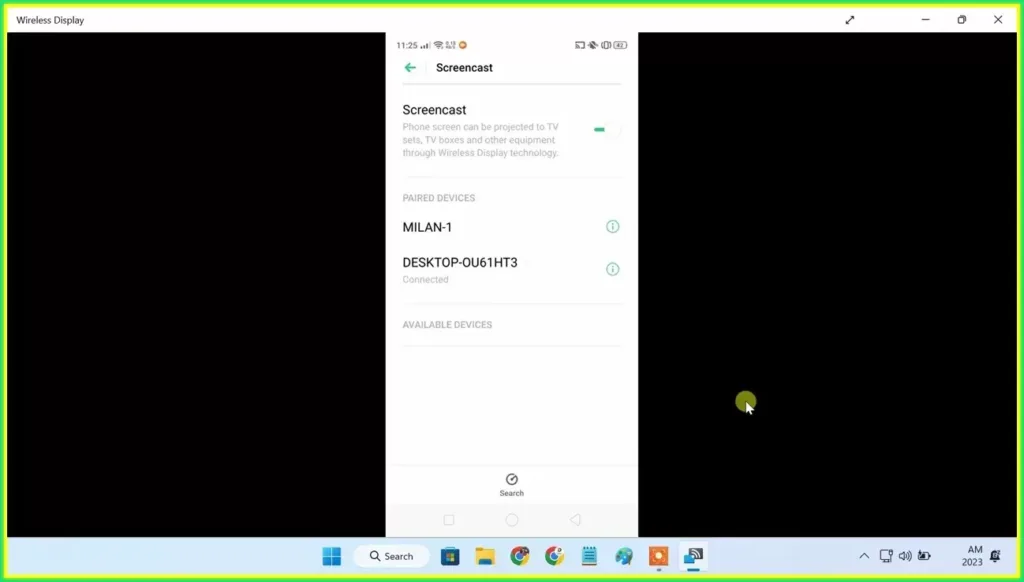
- On your Android phone, pull down the quick settings panel from the top of your screen again and tap on the Cast icon. This will open the Cast screen on your phone.
- You should see a list of available devices that you can cast/mirror your phone screen to. Select your Windows 11 PC from the list. You may need to scan the QR code on your PC screen with your phone camera or enter a PIN code or confirm the connection request on your PC or phone.
- Once the connection is established, you should see your phone screen mirrored on your PC.
That’s it! You have successfully cast/mirrored your Android phone screen to Windows 11 PC wirelessly using Quick Settings. You can now enjoy your mirrored phone screen on your PC. You can view your photos and videos, play your games, browse your apps, and do anything else that you can do on your phone. You can also control your phone from your PC using your mouse and keyboard.
To end the screen mirroring session, just disconnect from your phone or close the Wireless Display app on your PC.
Conclusion
In this blog post, you have come across easy steps in wireless mirroring of the Android screen on a Windows 11 PC. There are two methods that you can use to mirror your phone to the PC without using third-party applications: basic options of the devices and the Quick Settings application.
In this way, the user is able to transfer the content from his/her phone to a much bigger and improved screen. You can even use a mouse and keyboard to manipulate objects on your phone screen directly from your PC.
This is helpful for fun, learning, employment, and game-playing objectives, among others. For instance, you can view your favourite TV shows and movies, broadcast your slides or documents during business meetings and presentations, manipulate your phone applications without having to switch to your phone and play your native mobile applications games with graphics and sound quality.

")


: Key Differences and Use Cases")


