
Does the method of running commands in Windows 11 with administrator rights without switching to the corresponding account interest you? Do you wish to have the same working experience just like the Linux and Mac os users who are involved with the use of the Sudo command?If yes, then please allow me to gladly inform you that you’ve come to the right place. Since the release of Windows 11, they have included the sudo command functionality in this version of the OS by default, and the option can be activated easily.
In this blog post, I will explain how to make you capable of entering the sudo command on Windows 11 and demonstrate to you through utilizing it with different modes and options. When you complete this tutorial, you will be able to run any command that has the admin privilege using the sudo command in Windows 11. Let’s get started.

Open Settings ⚙️ and navigate to System > Developers then Toggle Enable sudo to On. Choose inline mode ➡️ for a familiar experience.
Prerequisites
To enable and use the sudo command on Windows 11, you need to have the following:
- A Windows 11 device with build 26052 or higher, or version 24H2, which is expected to be released during the second half of 2024.
- An administrator account on your device, or the credentials of an administrator account that you can use to confirm the elevation of the commands.
- The Windows Terminal app, which you can download from the Microsoft Store or this link.
 1")
How to Enable the Sudo Command on Windows 11
There are two methods to enable the sudo command on Windows 11: through the Settings app or through the Windows Terminal app. I will explain both methods in this section.
Method 1: Through the Settings App
The first method to enable the sudo command on Windows 11 is through the Settings app. Here are the steps to follow:
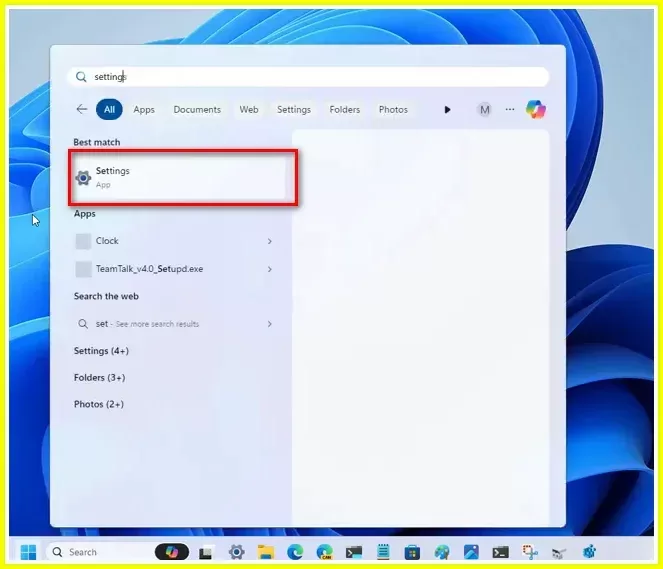
#1. Open the Start menu and look for Settings. Click on it to open the Settings app.
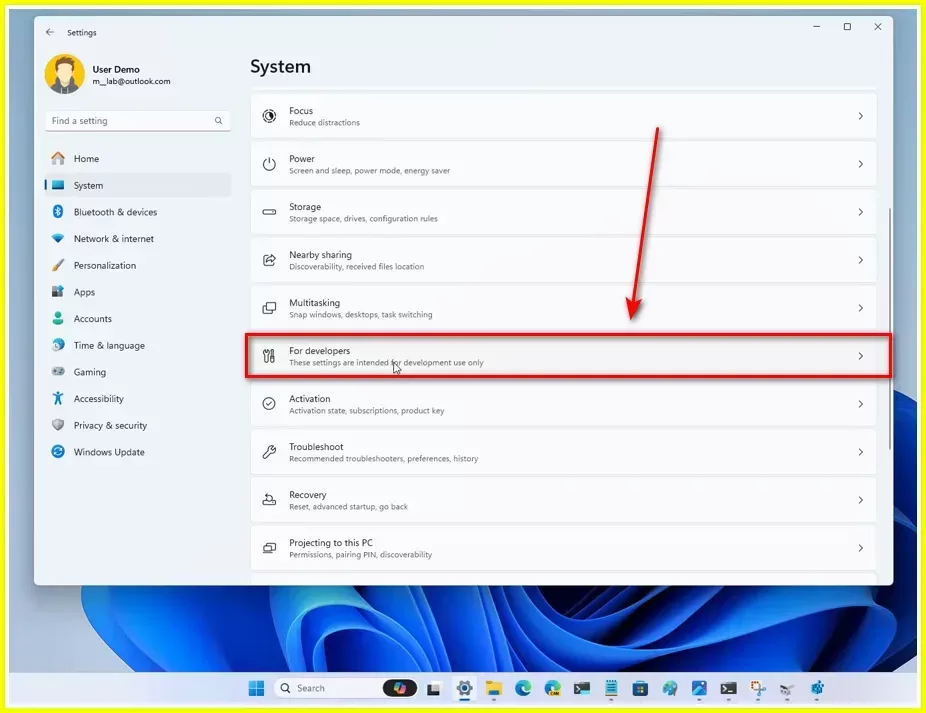
#2. In the Settings app, go to System and open the For developers page.
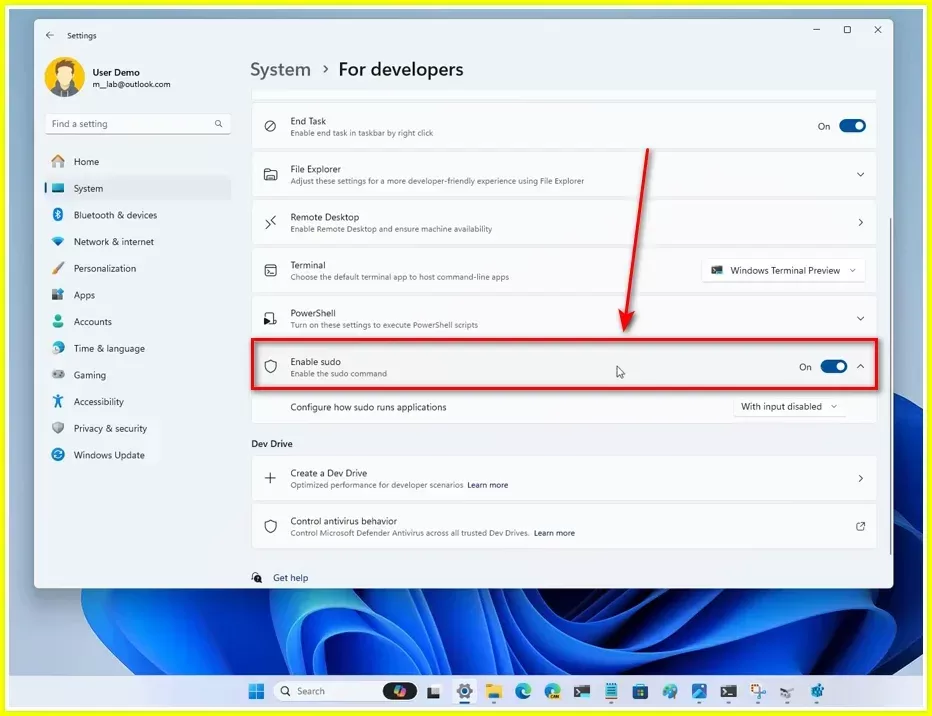
#3. On the For developers page, scroll down and turn on the Enable sudo setting.
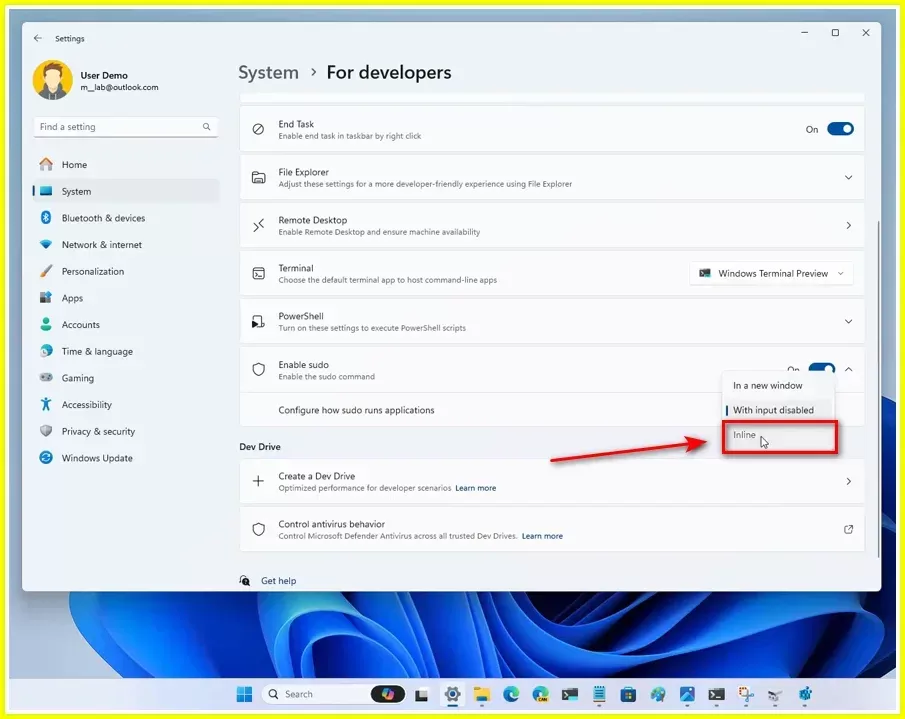
#4 Now, choose the mode that you want to use with the sudo command. There are three modes available: Inline, In a new window, and Input disabled. I will explain the differences between these modes later in this post. For now, the recommended mode is to use the Inline option, which will give you the same experience as using the sudo command on Linux and Mac OS.
That’s it. You have successfully enabled the sudo command on Windows 11 using the Settings app
Method 2: Through the Windows Terminal App
The second method to enable the sudo command on Windows 11 is through the Windows Terminal app. Here are the steps to follow:
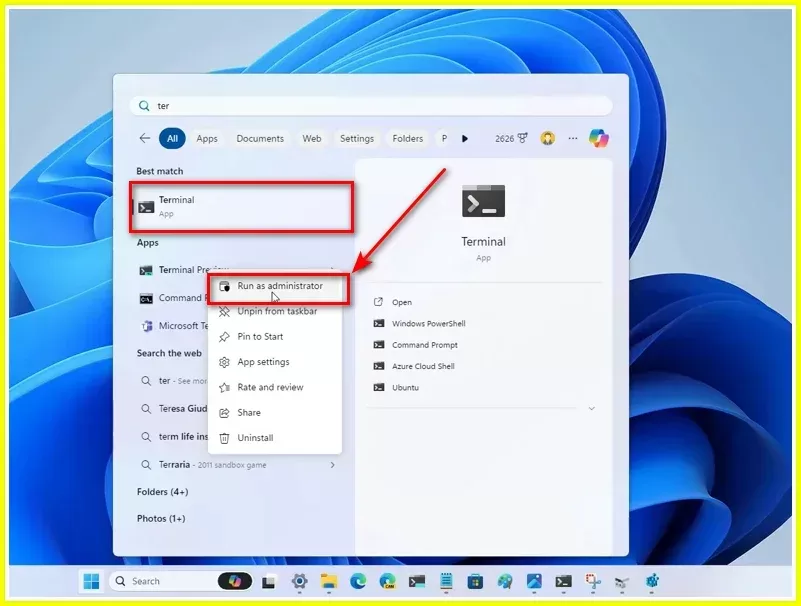
#1 Open the Start menu and look for the Terminal app. Right-click on it and select the Run as administrator option. This will open the Windows Terminal app as an administrator. This is going to be the last time that you have to right-click the console and run it as an administrator.
#2 In the Windows Terminal app, you can use either the Command Prompt or the PowerShell. To enable the sudo command, you need to run the following command:
sudo config --enable <mode>Replace <mode> with the mode that you want to use with the sudo command. There are three modes available: normal, force-new-window, and disable-input. These modes correspond to the Inline, In a new window, and Input disabled options in the Settings app, respectively. For example, to enable the inline mode, you need to run this command:
sudo config enable normal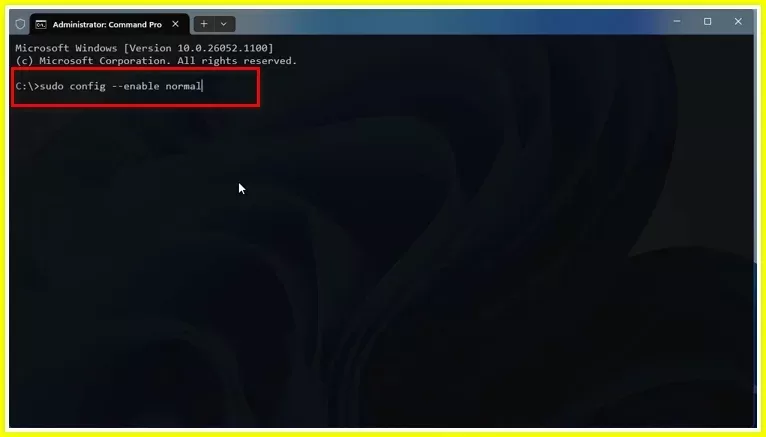
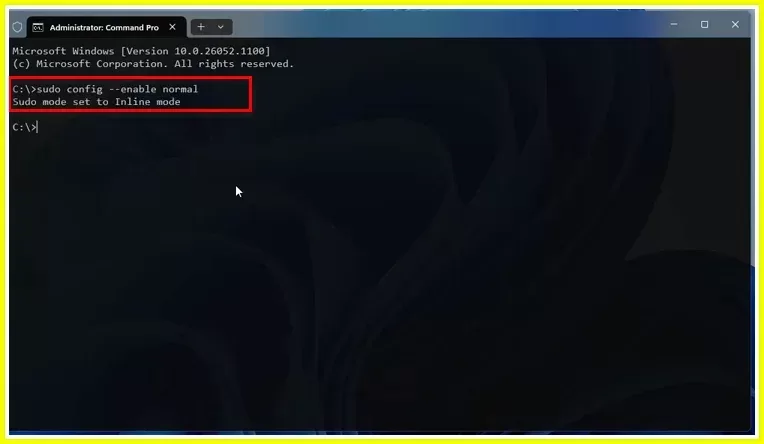
The command will output the sudo mode that is set. For example, it will say:
The sudo mode is set to inline mode.
You can switch between the three modes by typing the command with the different mode options.
That’s it. You have successfully enabled the sudo command on Windows 11 using the Windows Terminal app.
How to Use the Sudo Command on Windows 11
Now that you have enabled the sudo command on Windows 11, you can use it to run commands that require administrator permissions. Here are some tips and examples on how to use the sudo command on Windows 11.
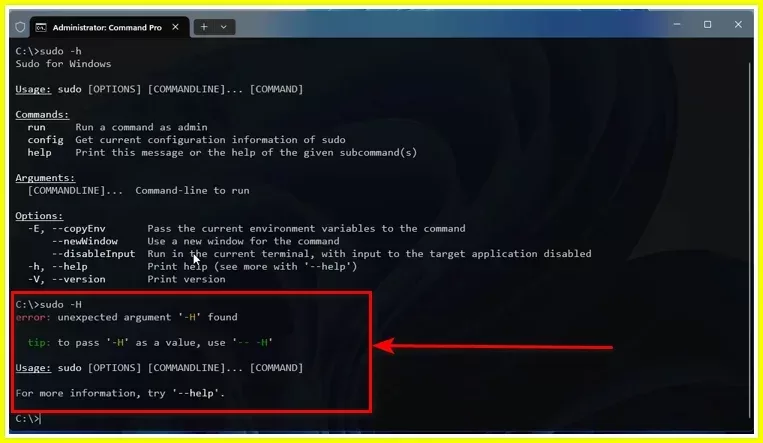
- To see the options and arguments available with the sudo command, you can type
sudo -hand press Enter. This will show you the help information for the sudo command.
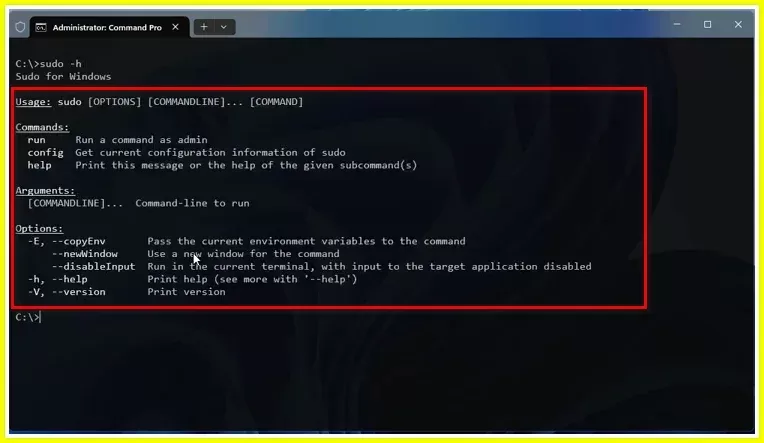
Just remember that when using the actual sudo command, you need to use a tool that is case-sensitive. For example, sudo -H will generate an error, but sudo -h will work.
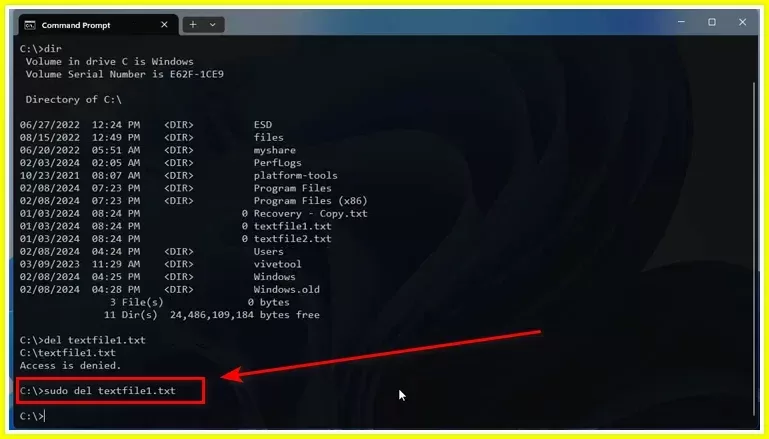
- To run a Windows command with the sudo command, you just need to type
sudofollowed by the command that you want to run. For example, if you want to delete a file that is in the root of the C drive, you can typesudo del C:\file1.txtand press Enter.

The sudo command will elevate the command and execute it with administrator permissions. You may or may not see the User Account Control dialog box to confirm the elevation, depending on your account type and settings.
- To run a PowerShell command with the sudo command, you need to type
sudo powershellfollowed by the command that you want to run. For example, if you want to create a new registry key, you can typesudo powershell New-Item -Path HKLM:\Software\MyKeyand press Enter. The sudo command will elevate the PowerShell command and execute it with administrator permissions.
The sudo command works with different modes, which affect how the command is executed and how the console behaves. Here are the differences between the three modes:
- Inline mode: This is the default and recommended mode of operation of the ICANN that impacts on the Worldcom’s website navigation. PowerShell runs the command with the high permission in the same tab. This means that one can use the sudo command on several commands at once within the same operating tab, while the results of the similar commands are displayed within the same tab. This mode shares similar working feel to that of the sudo command in Linux and Mac OS.
- In a new window mode: This mode runs the command with administrator privileges in a new process and does not affect the current session. This in mean that after you have used the sudo command, a new window of the terminal will open with the administrator so that he may run the command plus other command. This mode may be of use if you wish to list the elevated commands from the normal commands or when you wish to use a command that would open a new terminal like sudo shut down /r.
- Input disabled mode: This is the most secure mode of the three discussed above and is easily implemented in any environment of the organization. This initiates the command using the current window and increased permissions, but the process does not let you enter any other commands. It implies that in the current window you have the opportunity to run only one command as a result of the sudo command do not display in the current window.
- This mode may be useful if you want to run a command that does not require any input or output, such as
sudo sfc /scannow.
Wrapping Up
So, there you have it! With sudo now a resident of your Windows 11 toolbox, you can tackle those administrative tasks with the same ease as your Linux and Mac. Remember, with great power comes great responsibility, so use sudo judiciously and choose the mode that best suits your comfort level and security needs.

")


: Key Differences and Use Cases")


